Captain Ratatype

What are the tactile bumps and what do they do
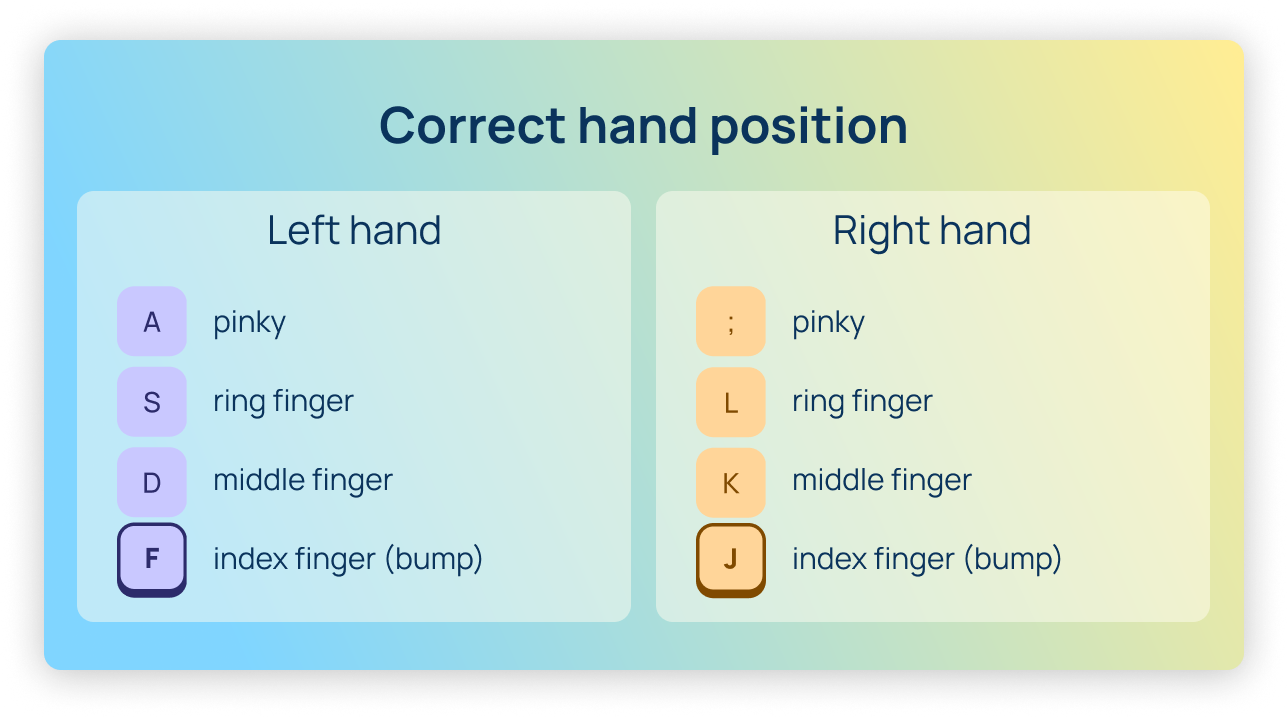
The official term for these bumps is tactile home position indicators. They mark the F and J keys as the resting point for the index fingers of the left and right hands. Along with the other keys on the home row — A, S, D, F for the left hand and J, K, L, ; for the right — they establish the baseline position from which every keystroke originates.
The logic is straightforward: when your fingers always know where home is, your eyes are free to stay fixed on the screen rather than darting down to the keyboard. This is what touch typing is built on — a method that can dramatically boost your typing speed whilst cutting down on mistakes.
Every time you lift your hands away from the keyboard — to pick up a cup of tea, scratch your nose, or push your glasses back up — your fingers don't need to look for the right position when they return. They simply feel the bumps on F and J and slot straight back into place. This reflex takes hold fairly quickly and eventually happens without any conscious thought at all.
Index fingers are the strongest and most dexterous of the lot. That is precisely why the reference points sit on F and J: from those two keys, you can reach the most frequently used letters with equal ease on either side.

How the correct hand position works and why it makes you type faster
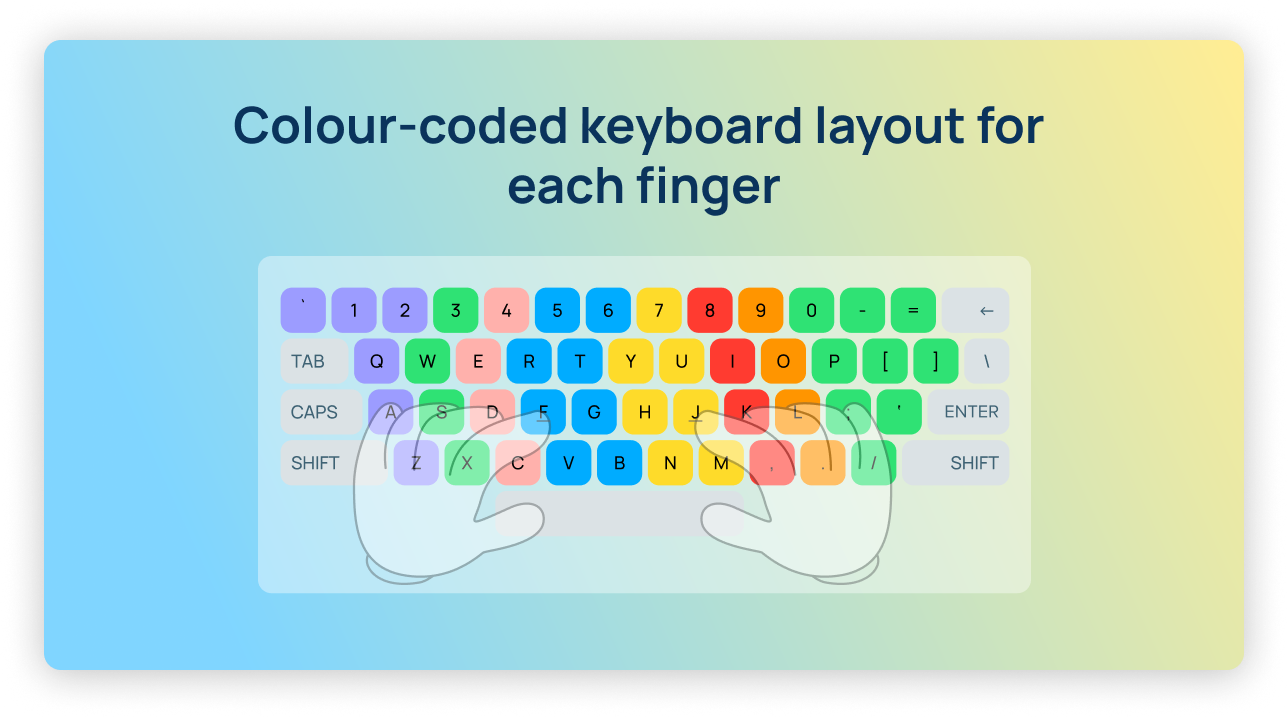
In touch typing, each finger has its own designated area of the keyboard. The left little finger covers A, the ring finger S, the middle finger D, and the index finger F and G. On the right-hand side, the index finger handles J and H, the middle finger K, the ring finger L, and the little finger the semicolon and everything else to the right. Both thumbs share responsibility for the space bar.
This arrangement is no accident. It keeps finger travel to a minimum and spreads the workload evenly across all ten fingers. Someone who types correctly from the home position makes far fewer unnecessary movements than a person who hunts about for keys with two or three fingers using the so-called "hunt and peck" method.
The figures speak for themselves: the average two-finger typist manages 27–40 words per minute. A seasoned user who has properly mastered touch typing with correct hand placement can comfortably reach 70–90 words per minute, with some pushing past 120. The gap is considerable, and it all comes down to the fingers knowing their position without any help from the eyes.
Have a look at our video guide to faster typing.
The origins of the QWERTY layout: the full story
To understand why the keyboard ended up the way it did, you need to go back to the 1860s. Back then, "fast typing" meant something altogether different — mechanical hammers, ink ribbons, and paper tape.
1868 — the first commercial typewriter
Christopher Latham Sholes, an American journalist and inventor, along with his partner Carlos Glidden, was granted a patent for a typewriter. Early models had the keys laid out either alphabetically or in a fairly arbitrary order, depending on the design. The machine existed, but a practical keyboard was still a long way off.
The central problem with early typewriters was mechanical: each key was attached to a metal hammer that struck an ink ribbon and left a character on the paper. If the typist — and most operators at the time were women — pressed neighbouring keys in quick succession, the hammers would clash and jam the whole mechanism. When you were working on important documents, that was a genuine catastrophe.
1873 — the birth of QWERTY
Sholes spent several years reworking the layout. His reasoning was this: if letters that commonly appear next to one another in English words were placed well apart on the keyboard, the hammers would have enough time to return to their resting position between strikes. He studied the frequency of letter combinations in English and split up the "troublesome pairs", assigning them to different hands or different parts of the keyboard.
That is how the layout we know today came into being. The top letter row — Q W E R T Y U I O P — gave it its name. It was not ideal from an ergonomic point of view, but it cracked the chief problem of the day: mechanical jamming.
1878 — Remington puts QWERTY into mass production
Sholes sold the rights to his typewriter to the Remington company — yes, the very same firm that manufactured rifles. After the end of the Civil War, Remington was looking for ways to redeploy its production capacity and placed its bets on typewriters. The company invested heavily in both manufacturing and marketing, and QWERTY began its triumphant march across America and then the rest of the world.
The network effect did its work: the more people learned to type on QWERTY, the greater the demand for those machines. The more QWERTY machines were sold, the more schools and training courses taught that very layout. Once the flywheel was spinning, stopping it became virtually impossible.
The myth of deliberate inconvenience
There is a popular story that Sholes deliberately designed QWERTY to be awkward, slowing typists down and preventing jams in the process. This is an overstatement. For a start, Sholes had no interest in slowing anyone down — he was trying to solve a genuine engineering problem. What is more, by the standards of his era, QWERTY was a perfectly sensible solution: it divided the workload between both hands and reduced the number of jams considerably.
The trouble is that the mechanical logic of the 1870s is entirely irrelevant to an electronic keyboard in the 2020s. There are no hammers any more. But QWERTY stayed all the same.
1936 — Dvorak proposes a better alternative
August Dvorak, an American psychologist and educator, carried out extensive research into how fingers move during typing and developed an alternative layout — the Dvorak Simplified Keyboard. He placed the most common vowels (A O E U I) on the home row of the left hand and the most frequently used consonants (D H T N S) on the home row of the right. The upshot: when typing on Dvorak, fingers travel roughly half the distance they would on QWERTY.
Dvorak obtained a patent, conducted studies, and proved the merits of his layout. And he still lost. Not because his design was inferior, but because by 1936 QWERTY had already trained several generations of people. Retraining the entire workforce would have been far too costly and disruptive.
Today: QWERTY for ever?
Modern alternatives to QWERTY — Dvorak, Colemak, Workman, Bépo for French — are genuinely more ergonomic by any objective measure. Yet research consistently shows that an experienced QWERTY typist who switches to Dvorak gains only a few percentage points of speed after several months of retraining. For most people, that improvement simply does not justify the effort.
QWERTY endures as the standard because of what economists call path dependence. A decision taken in 1873 to accommodate mechanical hammers still governs how billions of people interact with computers, mobile phones, and tablets today.
How the bumps on F and J help you learn to type faster
Let us come back to the bumps. If you want to improve your typing speed — whether for work or simply to keep pace with your own thoughts as you write — the tactile bumps on F and J are your first point of reference.
Shut your eyes, lift your hands from the keyboard, and set them back down. Find F and J by touch alone — no peeking. That is where muscle memory begins, and with time it will turn the keyboard into a natural extension of your hands.
The first week of practising touch typing is the hardest. Your speed drops, your fingers get muddled, and the temptation to glance down is constant. But that is precisely the moment when the bumps on F and J earn their keep: they give your fingers a fixed point to come back to.
If you would like to check your current typing speed or begin learning the touch method from scratch — the Ratatype trainer will take you through it step by step, entirely free of charge. Start with the home row: rest your fingers on A S D F and J K L ;, feel the bumps on F and J — and off you go.
Reference list
- hagley.org
- britannica.com
- wikipedia.org
- hackaday.com